Powerpoint 'Smoothzoom' technique
The problem
For better or worse, Powerpoint is almost a defacto standard amongst people giving presentations today. Unfortunately, Powerpoint is a crude tool and has many shortcomings. A lot of these shortcomings relate to Powerpoint's handling of graphics. One of the major limitations, in my opinion, regards Powerpoint's handling of graphics that are being shrunk or expanded. These often end up pixelated or poor quality when there is no need.
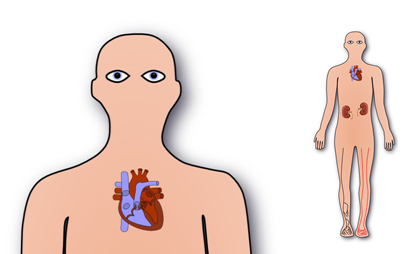
Let's consider an example from a recent presentation I gave. It's a schematic image of a man. Here's a close-up of the large head next to a full size image of the small body. You can see that both the large and small images are clear and not pixelated at all.
If you apply the built-in Powerpoint animations to make the large image smaller and the small image larger, the images become very poor quality. The newly enlarged image is blocky and the shrunk image is in serious need of some anti-aliasing.

These are the images after a built-in Powerpoint zoom has been applied. This is a section of the full image at 100% zoom. Click for the complete image at 100% zoom.
Smoothzoom
So what can we do about Powerpoint's failings? I've thought about this and developed a technique I call Smoothzoom which I've used for many of my presentations since. If we take a look at the same two images after a Smoothzoom, you can't tell the difference from the original images.

These are the images after applying the Smoothzoom technique. This is a section of the full image at 100% zoom. Click for the complete image at 100% zoom.
Implementing Smoothzoom
I've attached an example Powerpoint file here for you to look at the implementation of Smoothzoom. It may be good to look at this as I discuss it below.
Download Smoothzoom_demonstration.ppt (205 kB)
The implementation revolves around pre-pepared images at each size and some Powerpoint sleight of hand. It is perfeclty possible to prepare images zoomed to any size using proper image handling software provided that you've got a good quality original.
In both cases, these pre-prepared images are key. Any size image can be prepared in advance in a proper image-editing program provided that you have a high quality source image. In advance of preparing a slide, decide on the two image sizes you want (source and destination) and prepare two files outside of Powerpoint that are the right size. If you are planning on shrinking an image to 25% of it's original size, prepare a target image at 1/4 of the source size. If you plan on zooming an image to 400%, prepare a target image 4 times the size of the source image. I often use the GNU Image Manipulation Program (GIMP) to prepare the images.
Given two appropriately sized images, I'll give a Smoothzoom summary for two cases: (1) making a large image smaller then larger again and (2) making a small image larger then smaller again.
Making a large image smaller then larger again
This is the simpler of the two techniques. Just follow these steps to set up a Smoothzoom between the two (Follow along in the example file above).
- Import both images into Powerpoint and centre them horizontally and vertially on top of each other. Set the small image on top of the large image.
- Animate the large image to become smaller in the normal manner.
- Immediately after the first animation finishes, set the small image to appear.
That is all that is required. When you are ready to enlarge the image again (if you should want to), set the small image to disappear and the pre-shrunken large image to expand simultaneously and the animation will finish with a perfect image.
Making a small image larger then smaller again
This technique is a little more complicated than the first:
- Import both the images into Powerpoint and centre them horizontally and vertically on top of each other. Set the small image on top of the large image.
- Insert a white panel (or whatever background colour you are using) that exceeds the size of the large image. Use it to cover the large image but make sure that the small image is in front of it. You should now have a large image nearest the background, a panel covering it and a small image on top of the panel.
- Set the large image to shrink to the size of the small image as soon as the slide starts. Set it to animate as quickly as possible. This animation will be hidden by the panel on top of the large image.
- When you wish to enlarge the small image, make both the small image and the panel disappear at the same time as the pre-shrunken large image begins to expand. This means that the quality of the large image is maintained after zooming.
If you wish to reverse the enlargement, set the large image to shrink again and then set the ready-prepared small image to appear as soon as the large image has finished shrinking. There is an example of this in the sample file above.
Summary
This technique allows images to be enlarged and shrunk in Powerpoint with no loss of quality provided a little work is done before-hand in preparing source files. The sample file above gives examples of all the techniques talked about here. I have tested this in Powerpoint XP but not in the latest versions. The technique relies on sleight of hand by replacing shrunk images with pre-prepared images instantly and relying on the fact that the visual cortex can't notice the swap provided that it is done at the end of a zooming action.
First published on 27th February 2011 and last modified on 21st March 2011.
